簡単なエディタをつくる試み レイアウトを実行時に変更
React を使って、ボタンを押すとレイアウトが変わる仕組みをつくりたい。
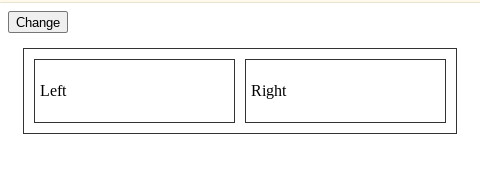
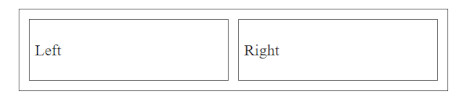
初期状態はこれ。
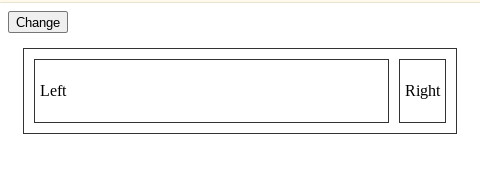
Change ボタンをクリックすると次のように変化する。
Left のパネルを css grid で auto 指定している。(Right は 1fr を指定)
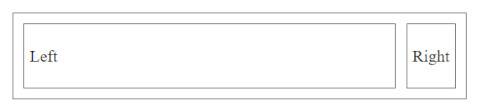
さらに Change ボタンをクリックすると次のように変化する。

Right のパネルを css grid で auto 指定している。(Left は 1fr を指定)
このような仕組みを React で実装する方法を調べた。
開発環境
$ npm --version
10.2.3
$ node --version
v20.10.0
my-layout プロジェクト作成
$ mkdir my-layout
$ cd my-layout
$ npm init -y
必要なモジュールを入れる。
$ npm install --save react react-dom
$ npm install --save-dev @babel/core @babel/preset-env @babel/preset-react babel-loader
$ npm install --save-dev webpack webpack-cli
babel.config.json, webpack.conf.js の用意。
babel.config.json
{
    "presets": ["@babel/preset-env", "@babel/preset-react"]
}
webpack.config.js
var path = require("path");

module.exports = {
    entry: "./src/index.js",
    output: {
        path: path.join(__dirname, "dist"),
        filename: "layout.js"
    },
    module: {
        rules: [
            {
                test: /\.js/,
                exclude: /node_modules/,
                loader: "babel-loader"
            }
        ]
    }
};
src/index.js にコードを書いてバンドルした成果物を ./dist/layout.js に出力する設定です。
プレースフォルダとしてのディレクトリとファイルを用意。
$ mkdir src
$ touch src/index.js
$ mkdir dist
$ touch dist/index.html
基本的なレイアウトを作成
src/index.js を用意。
import React from "react";
import {createRoot} from 'react-dom/client';

import LeftPanel from "./LeftPanel";
import RightPanel from "./RightPanel";

function Layout() {
  return (
    <div className="container">
      <LeftPanel />
      <RightPanel />
    </div>
  );
}

const container = document.getElementById("root");
const root = createRoot(container);
root.render(<Layout />);
ここに出現する LeftPanel, RightPanel 要素はまだ準備していません。 それらを用意します。
$ touch src/LeftPanel.js
$ touch src/RightPanel.js
src/LeftPanel.js
import React from "react";

function LeftPanel() {
  return (
    <div className="leftPanel">
      <p>Left</p>
    </div>
  );
}

export default LeftPanel;
src/RightPanel.js
import React from "react";

function RightPanel() {
  return (
    <div className="rightPanel">
      <p>Right</p>
    </div>
  );
}

export default RightPanel;
dist/index.html を用意します。
<!DOCTYPE html>
<html>
  <head>
    <meta charset="utf-8" />
    <title>my layout</title>
  </head>
  <body>
    <div id="root"></div>
    <script src="./layout.js"></script>
  </body>
</html>
npx webpack --mode development を実行して dist/layout.js を生成。
この段階でのファイル構成を確認。
.
├── babel.config.json
├── dist
│   ├── index.html
│   └── layout.js
├── node_modules/...
├── package.json
├── package-lock.json
├── src
│   ├── index.js
│   ├── LeftPanel.js
│   └── RightPanel.js
└── webpack.config.js
それでは python3 -m http.server 8000 --directory dist するなどして、./dist をドキュメントルートとしてWebサーバを起動。 ブラウザで http://localhost:8000/ にアクセス。
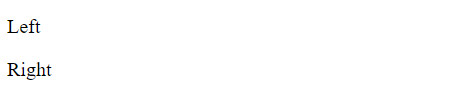
これではLeft/Rightパネルの状態がよくわからないので、 ボーダーをCSSで指定します。
dist/index.html を修正。
<!DOCTYPE html>
<html>
  <head>
    <meta charset="utf-8" />
    <title>my layout</title>
    <style>
.container {
  margin: 15px;
  padding: 10px;
  border: solid 1px #333;
}
.leftPanel, .rightPanel {
  margin: 5px;
  padding: 5px;
  border: solid 1px #333;
}
    </style>
  </head>
  <body>
    <div id="root"></div>
    <script src="./layout.js"></script>
  </body>
</html>
これでブラウザで確認すると次のようになります。
現状では Left, Right のパネルは上下に配置されていますが、 これを文字通り左右に配置したい。 そのため CSS Grid を使ってスタイルを変更します。
dist/index.html
<!DOCTYPE html>
<html>
  <head>
    <meta charset="utf-8" />
    <title>my layout</title>
    <style>
.container {
  display: grid;
  grid-template-columns: 1fr 1fr;
  column-gap: 10px;
  margin: 15px;
  padding: 10px;
  border: solid 1px #333;
}
.leftPanel, .rightPanel {
  margin: 0;
  padding: 5px;
  border: solid 1px #333;
}
    </style>
  </head>
  <body>
    <div id="root"></div>
    <script src="./layout.js"></script>
  </body>
</html>
主な修正点は .container に grid を指定したことです。
.container {
  display: grid;
  grid-template-columns: 1fr 1fr;
  column-gap: 10px;
  ...
}
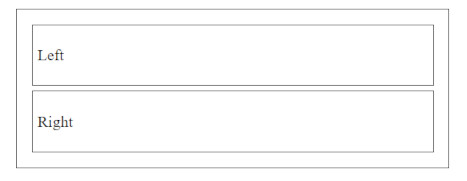
display: grid 指定した上で、 grid-template-columns を 1fr 1fr としたことで、 Left と Right パネルが左右に並んでレイアウトされました。 またそれぞれの占める割合は 1 : 1 に指定しました。
これで 期待するレイアウトをつくることができました。
振る舞いの追加
いよいよ、本題の ボタンをクリックしたら左右のパネルの大きさが変化するという振る舞いを追加します。
実装方針として ボタンをクリックするたびに grid-template-columns の値を変化させることによって 左右のパネルの大きさを変化させることにします。
初期状態は grid-template-columns: 1fr 1fr とし、 ボタンがクリックされたら grid-template-columns: 1fr auto に変わり、 さらにボタンがクリックされたら grid-template-columns: auto 1fr に変わり・・・という具合いです。
そこで、 dist/index.html に記述していた grid に関するスタイル設定を React側( src/index.js )へ移動します。
dist/index.html
.container から grid 関係のスタイル指定を削除します。
<!DOCTYPE html>
<html>
  <head>
    <meta charset="utf-8" />
    <title>my layout</title>
    <style>
.container {
  margin: 15px;
  padding: 10px;
  border: solid 1px #333;
}
.leftPanel, .rightPanel {
  margin: 0;
  padding: 5px;
  border: solid 1px #333;
}
    </style>
  </head>
  <body>
    <div id="root"></div>
    <script src="./layout.js"></script>
  </body>
</html>
src/index.js
dist/index.html 側に設定していた grid 設定を こちらに移動します。
import React from "react";
import {createRoot} from 'react-dom/client';

import LeftPanel from "./LeftPanel";
import RightPanel from "./RightPanel";

function Layout() {
  const style = {
    display: "grid",
    gridTemplateColumns: "1fr 1fr",
    columnGap: "10px"
  };

  return (
    <div className="container" style={style}>
      <LeftPanel />
      <RightPanel />
    </div>
  );
}

const container = document.getElementById("root");
const root = createRoot(container);
root.render(<Layout />);
実行してブラウザで確認します。
さきほどと同じ状態になりました。
現状は style に grid スタイルを次のように書いているだけです。 このままでは gridTemplateColumns の値を変化させられません。
  const style = {
    display: "grid",
    gridTemplateColumns: "1fr 1fr",
    columnGap: "10px"
  };
実行時にダイナミックにこの値を変更するためには 次のように toStyle 関数をつくり、 "1fr 1fr" など gridTemplateColumns に適用したい値を適用して、 スタイルを生成するように変更します。
  const toStyle = (value)=>{
    return {
      display: "grid",
      gridTemplateColumns: value,
      columnGap: "10px"
    };
  };
container にスタイルを指定する部分は次のようにします。
  return (
    <div className="container" style={toStyle("1fr 1fr")}>
      <LeftPanel />
      <RightPanel />
    </div>
  );
試しに "1fr 1fr" に代えて "1fr auto" を指定して実行してみましょう。
<div className="container" style={toStyle("1fr auto")}>
Right パネルが狭くなり、Left パネルが残りの領域を占めるようになりました。
あとは、 Button を追加してクリックしたときに、この値を適切に変化させれる処理を追加します。
この gridTemplateColumns の値を ステート(状態)として扱うので useState を入れます。
//import React from "react";
import React, { useState } from "react";
そして gridTemplateColumns 値をここでは thatValue として扱うことにして、 Layoutコンポーネントに次の記述を追加。
function Layout() {
  const [thatValue, setThatValue] = useState("1fr 1fr");
そして Button を追加します。また toStyle(thatValue) として gridTemplateColumns の値を指定します。
  return (
    <>
      <button onClick={buttonClicked} >Change</button>
      <div className="container" style={toStyle(thatValue)}>
        <LeftPanel />
        <RightPanel />
      </div>
    </>
さらに Button を Click したときに実行する buttonClicked 関数を定義。
  const buttonClicked = ()=>{
    if( thatValue=="1fr 1fr" ){
      setThatValue("1fr auto");
    } else if( thatValue=="1fr auto" ){
      setThatValue("auto 1fr");
    } else if( thatValue=="auto 1fr") {
      setThatValue("1fr 1fr");
    }
  };
buttonClicked がコールされるたびにレイアウトを変更するtoggleボタンとして振る舞わせます。
結局これらの変更を反映した src/index.js は次のようになりました。
import React, { useState } from "react";
import {createRoot} from 'react-dom/client';

import LeftPanel from "./LeftPanel";
import RightPanel from "./RightPanel";

function Layout() {
  const [thatValue, setThatValue] = useState("1fr 1fr");

  const toStyle = (value)=>{
    return {
      display: "grid",
      gridTemplateColumns: value,
      columnGap: "10px"
    };
  };

  const buttonClicked = ()=>{
    if( thatValue=="1fr 1fr" ){
      setThatValue("1fr auto");
    } else if( thatValue=="1fr auto" ){
      setThatValue("auto 1fr");
    } else if( thatValue=="auto 1fr") {
      setThatValue("1fr 1fr");
    }
  };

  return (
    <>
      <button onClick={buttonClicked} >Change</button>
      <div className="container" style={toStyle(thatValue)}>
        <LeftPanel />
        <RightPanel />
      </div>
    </>
  );
}

const container = document.getElementById("root");
const root = createRoot(container);
root.render(<Layout />);
これで Button をクリックするたびに 次のようにレイアウトが変化するコンポーネントをつくることができました。
まとめ
この機能があれば、左側にエディタ(マークダウンでテキストを書く)、 右側にマークダウンプレビューを表示する、というレイアウトをつくった上で、 ボタンをクリックすることで、 プレビューを隠してエディタのみの表示にしたり、 逆にエディタを隠して、プレビューのみの表示する、 という機能をつくることができる(だろう)。
Liked some of this entry? Buy me a coffee, please.